Tool Caddy SVG: Crafting a Functional 3D Paper Organizer
In the world of digital crafting and paper engineering, finding designs that bridge the gap between decorative art and practical utility can be a challenge. Many SVG files produce beautiful but fragile items destined for display shelves. However, the Tool Caddy SVG represents a shift toward functional craftsmanship, allowing creators to build a sturdy, rustic-style wooden tool box entirely out of paper. This 3D Tool Caddy Box is not merely a novelty; it is a structured project that results in a usable container for organization or gifting.
Whether you are preparing for Father’s Day, looking for a unique birthday gift for a handy friend, or simply seeking a creative way to organize desktop supplies, understanding the nuances of this specific design is essential. This guide explores the characteristics, assembly considerations, and practical applications of the Tool Caddy SVG to help you determine if this project aligns with your crafting goals.
Understanding the 3D Tool Caddy Design Architecture
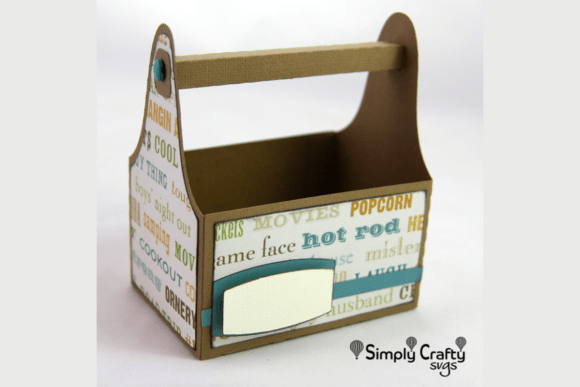
The primary appeal of this specific Tool Caddy SVG lies in its structural integrity. Unlike standard paper boxes that rely solely on tab-and-slot friction, this design mimics traditional carpentry. The iconic center handle is engineered to distribute weight evenly, making the caddy sturdy enough to carry without collapsing. This architectural choice transforms a flat sheet of cardstock into a three-dimensional object with genuine tactile feedback and durability.
The file itself is comprehensive, designed to provide depth rather than a flat appearance. It includes three distinct component types:
- Main Caddy Structure: The foundational skeleton that provides the box's volume and strength.
- Decorative Panels: Overlay pieces that add visual texture and reinforce the "wooden" aesthetic without requiring actual timber.
- Blank Word Label: A customizable element allowing crafters to add names, sentiments, or functional labels like "Pens," "Brushes," or "Dad’s Tools."
This layered approach is what separates a professional-grade 3D paper model from a simple cutout. By separating the structure from the decoration, the Tool Caddy SVG allows for material flexibility. You might choose a heavy, solid-colored cardstock for the internal structure to ensure rigidity, while using a lighter, textured pattern paper for the exterior panels to achieve a realistic wood-grain look.
Material Selection and Technical Specifications
Success with 3D paper modeling depends heavily on material choice. Because the finished dimensions of this caddy are compact—measuring 4” x 2.8″ x 4.7” tall—precision is paramount. Using paper that is too thin will result in a flimsy product, while paper that is too thick may prevent slots from fitting together cleanly.
Recommended Paper Weight and Type
For the main body of the Tool Caddy SVG, a standard 8.5″ x 11″ cardstock sheet is typically sufficient. However, not all cardstocks are created equal. Experience suggests using a textured cardstock, such as American Crafts AC Textured Cardstock, specifically in neutral tones like Latte. The texture serves a dual purpose: it hides minor glue marks or scoring imperfections, and it enhances the illusion of a rustic wooden surface.
For the decorative overlay panels, you can utilize smaller scraps or pattern paper. Since these layers do not bear structural load, they can be slightly lighter in weight, which actually aids in adhesion. When layering paper, reducing the bulk at glue points ensures cleaner corners and a more professional finish.
Adhesives and Assembly Tools
While the design relies on interlocking tabs, adhesive is necessary for long-term durability. A strong, quick-drying craft glue is preferred over glue sticks, which lack the tensile strength required for a handled box. When assembling the center handle mechanism, allow adequate drying time before testing the weight capacity. Rushing this step is the most common cause of failure in 3D paper projects.
Practical Applications and Use Cases
The versatility of the 3D Tool Caddy Box extends beyond its initial novelty. Understanding where and how to use this item helps justify the time investment required for assembly. Below are several real-world scenarios where this SVG file proves particularly valuable.
The Functional Gift Container
One of the most popular uses for this design is as a gift box for "the tool guy or gal." Instead of wrapping a gift in disposable paper, the packaging itself becomes part of the present. The blank word label allows for personalization, turning a generic craft project into a thoughtful gesture. For Father’s Day or birthdays, filling the caddy with high-quality screwdriver bits, a tape measure, or specialized drill accessories creates a cohesive theme. The recipient gains both the contents and a permanent storage solution.
Desktop and Craft Organization
For creators and professionals, desk clutter is a persistent issue. The compact footprint of the Tool Caddy SVG makes it ideal for organizing small, frequently used items. Its vertical orientation maximizes desk space efficiency. Common organizational uses include:
- Writing Instruments: Holding pens, markers, and styluses upright for easy access.
- Art Supplies: Storing paintbrushes, palette knives, or sculpting tools.
- Sewing Notions: Keeping scissors, thread snips, and bobbins contained.
- Tech Accessories: Organizing USB drives, SD cards, and cable ties.
Because the caddy is made of paper, it is lightweight and portable. Users can easily move their essential tools from a workspace to a meeting room or classroom without the bulk of a traditional metal or plastic organizer.
Evaluating Suitability: Strengths and Considerations
Before downloading and cutting the Tool Caddy SVG, it is important to evaluate whether this project meets your specific needs. While highly versatile, paper engineering has inherent limitations compared to traditional manufacturing.
Strengths of the Design
The primary strength is customization. Unlike store-bought organizers, every aspect of this caddy can be tailored. You can change the color scheme to match office decor, alter the label text for different recipients, or even modify the SVG file in vector software to adjust slot sizes for thicker materials. Additionally, the inclusion of a step-by-step video tutorial significantly lowers the barrier to entry. Visual guidance eliminates much of the guesswork associated with complex 3D assemblies, ensuring that even novice crafters can achieve a professional result.
Limitations and Practical Expectations
Despite its sturdy design, users must maintain realistic expectations regarding load capacity. This is a paper reproduction of a tool caddy, not a replacement for industrial storage. It is suitable for light hand tools, craft supplies, and office stationery, but it should not be used to carry heavy wrenches, hammers, or liquids. Moisture is also a critical consideration; the caddy should be kept in dry environments to prevent warping or adhesive failure.
Furthermore, the assembly process requires patience. While the video tutorial streamlines the experience, rushing through the layering or gluing phases will compromise the final aesthetic. This project is best approached as a mindful crafting activity rather than a quick production task. If you require immediate, heavy-duty storage, a commercial plastic bin may be more appropriate. However, if the goal is personalized, aesthetic organization or sentimental gifting, the Tool Caddy SVG offers superior value.
Tips for Successful Assembly
To maximize the quality of your finished 3D Tool Caddy Box, consider the following expert tips derived from community experience and best practices in paper crafting:
- Score Before Folding: Always use a scoring tool or bone folder along fold lines before bending. This prevents cracking in the cardstock fibers and ensures crisp, straight edges that mimic machined wood.
- Dry Fit First: Assemble the main structure without glue initially to ensure all tabs align correctly. This allows you to identify any cutting discrepancies or paper thickness issues before committing to adhesive.
- Layer Strategically: Apply glue sparingly to the decorative panels. Excess adhesive can seep out and stain the textured paper. Use a fine-tip applicator for precision.
- Customize the Label Early: Decide on your sentiment or name before final assembly. It is often easier to apply vinyl lettering, stamps, or handwritten text to the blank label while it is still flat, rather than trying to decorate it after the box is constructed.
Conclusion
The Tool Caddy SVG stands out in the digital crafting marketplace as a project that respects both form and function. By combining the nostalgic aesthetic of a rustic carpenter’s box with the precision of modern laser or die-cutting technology, it offers a satisfying building experience and a useful end product. Whether serving as a heartfelt vessel for a Father’s Day gift or acting as a charming organizer for a creative workspace, this 3D paper model demonstrates that functional beauty can indeed be crafted from a single sheet of cardstock. With the right materials, careful assembly, and an appreciation for the design's intended scale, crafters can create a lasting piece that transcends typical paper art.